PowerPoint file too big? Causes and fixes
Inspect your PPTX, then review pictures, video, fonts and embedded data in a practical order.
If your PowerPoint file is too big, inspect a copy of the PPTX and tackle the pictures, video or embedded data taking up space. Find what is large before cutting slides.
This article is published by the makers of XKey, a Windows PowerPoint add-in.
The steps below use native Windows desktop PowerPoint features. Microsoft's Reduce the file size of your PowerPoint presentations is the starting point for pictures, fonts and media; the other inspection and cleanup steps link to supplementary Microsoft guidance. Labels and available options vary by PowerPoint version.
Diagnose first: inspect a copied PPTX as a ZIP
Keep your editable original and make separate inspection and delivery copies. Removing cropped content or editing data can become irreversible after saving.
- Close PowerPoint and display filename extensions for the inspection copy. In Windows 11 File Explorer, use View → Show → File name extensions.
- Rename the inspection copy from
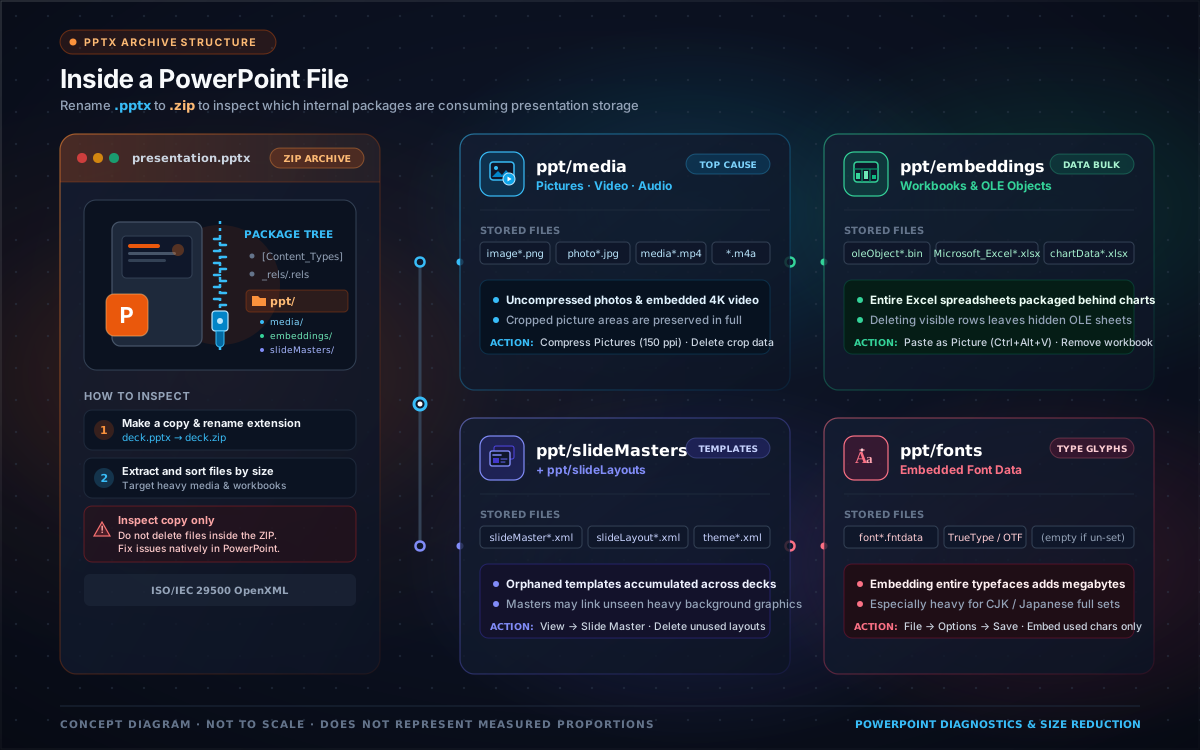
presentation.pptxtopresentation.zipand confirm the extension change. Opening it as a ZIP does not itself make it smaller. - Open the ZIP or extract it into a working folder and inspect the locations below. Sort files by size to find large pictures, videos or workbooks.
| Location to inspect | Contents and what to check | Next action |
|---|---|---|
ppt/media | Pictures, video and audio. Master background images may also be stored here | Consider picture or media compression |
ppt/embeddings | Excel workbooks behind charts and other embedded objects | Decide whether editable data is needed |
ppt/slideMasters, ppt/slideLayouts | Master and layout definitions. Their presence does not prove they are unused | Check usage in PowerPoint |
ppt/fonts | Embedded font data. The folder may be absent, depending on embedding | Review font-saving options |
Extracted sizes differ from compressed sizes inside the ZIP. Compare like with like; folder names or XML counts alone do not establish the cause. The size of a master's XML does not include the size of images it references.
Do not delete pictures, XML or workbooks directly inside the ZIP. That can break slide relationships. After inspecting, edit the delivery .pptx copy in PowerPoint. To restore the inspection copy's extension, change .zip back to .pptx. Microsoft's Extract files or objects from a PowerPoint file documents this inspection route.
1. Compress pictures and delete unwanted cropped areas
- Under File → Options → Advanced → Image Size and Quality, check the selected presentation. Clear Do not compress images in file and set the default resolution to 150 ppi or lower.
- Select a picture, then open Picture Format → Compress Pictures.
- Clear Apply only to this picture to process all pictures. Select Delete cropped areas of pictures when you no longer need the cropped content, and use the default resolution.
- Save a separate copy, reopen it and inspect small text and fine detail.
150 ppi is not the right setting for every use. Printing or detailed diagrams may justify retaining more image quality. Keep original images when you may need to restore cropped content. Microsoft's image size and quality options explain these settings.
2. Compress video and audio, or link instead of embedding
Use File → Info → Compress Media and choose an appropriate quality. This Windows feature applies when the presentation contains eligible media. Play the result from start to finish and check audio and readable detail.
Microsoft states that embedded subtitles and alternate audio tracks are lost during compression. If you need them, consider another delivery method before sharing. See Microsoft's media compression instructions for the limitations.
To avoid embedding a video, insert it again through Insert → Video → This Device, select the file, and use the arrow beside Insert to choose Link to File. Remove the original embedded video only after checking the linked version. Adding a link does not remove an existing embedded copy.
Sending only the PPTX will not give the recipient your local video file. Supply the related files appropriately and test in the receiving environment. Microsoft recommends putting the video in the presentation's folder before linking to reduce broken links. Check its guidance on embedded versus linked video.
3. Embed only the font characters used
Under File → Options → Save, find the presentation-sharing fidelity options. If embedding fonts, choose Embed only the characters used in the presentation. Turning font embedding on for a deck that did not use it is not a size-reduction step.
If recipients must add or edit text in the same font, keeping Embed all characters may be more appropriate. For Japanese presentations in particular, consider whether they will need characters absent from the original. Microsoft's font-embedding benefits and limitations explain the trade-off.
4. Remove unused masters and layouts
Open View → Slide Master and review masters and layouts brought in from other presentations. Select only items confirmed to be unused, then use Slide Master → Delete. You do not need to disrupt slides just to remove a layout they still use. See Microsoft's slide master editing instructions.
If the deck mixes several themes, another option is to create a new presentation with the required theme, copy only the slides you need, and choose Use Destination Theme. Keep Source Formatting brings the source theme along, so distinguish the two choices. Follow Microsoft's slide-copying instructions and check fonts, layouts and animations.
Moving to a new theme does not automatically remove large pictures or videos on the slides. You cannot know the saving from master cleanup until you save and compare the actual files.
5. Remove unnecessary embedded chart workbooks
If you need the chart's appearance but not editable source data, replace the chart with a picture, then delete the original chart. Microsoft describes this in Embedded files or objects found.
- Select the chart's outer area and copy it with Ctrl + C.
- Press Ctrl + Alt + V for Paste Special and select an available picture format.
- Check the appearance and quality before deleting the original editable chart. Select and delete any unnecessary embedded objects in PowerPoint as well.
- Save, reopen and check the chart and file size.
The picture no longer supports Edit Data. Keep an editable original separately. Clearing cells in a workbook does not necessarily remove the entire embedded object. Handle the corresponding object in PowerPoint rather than deleting its file from ppt/embeddings inside the ZIP.
6. Run Document Inspector and discard editing data
On the delivery copy, run File → Info → Check for Issues → Inspect Document and review the findings. Remove only items you no longer need, such as particular comments or notes, then reinspect. Some embedded objects can be detected but cannot be removed automatically by the inspector. Review and handle them as described in the previous section.
Next, select Discard editing data under File → Options → Advanced → Image Size and Quality. This removes information used to restore edited images; it is not a command to erase the presentation's entire editing history.
Both operations can remove information you need, so save separately from the editable original. See Microsoft's Document Inspector guidance and file-size reduction guide.
Check the trade-offs before changing the file
| Fix | What you may give up to reduce size |
|---|---|
| Picture compression and cropped-area deletion | Fine detail and the ability to restore cropped content |
| Media compression or external linking | Subtitles, alternate audio, or the convenience of playback without related files |
| Embedding only used font characters | Freedom to add new characters in the same font |
| Master cleanup or theme changes | Fidelity to the original design and layouts |
| Replacing charts with pictures | Source-data editing and updates |
| Removing inspector findings and discarding editing data | Necessary information such as notes, and reversible image edits |
Change one thing at a time, save, and compare size and appearance. If there is little of that content, the effect may be small. No particular reduction percentage is guaranteed.
Still cannot send it? Use PDF or a sharing link
| Delivery method | Suitable use and checks |
|---|---|
| Reading or printing. Use File → Export → Create PDF/XPS, then check size and appearance. Animations, video playback and original editing features do not carry over; a PDF is not guaranteed to be smaller | |
| Sharing link | Delivering the original deck, including editing or playback needs. Save to OneDrive or SharePoint, set viewing or editing permissions through Share, and send the link. This avoids attachment limits; it does not compress the original file |
Follow Microsoft's PDF-saving instructions and presentation-sharing instructions. Before sending, check recipient access and whether linked video can actually play.
Summary
Inspect a copied PPTX as a ZIP first, then choose the relevant fixes for pictures, media, fonts, masters and embedded workbooks. Keep an editable original and check the delivery copy's size, appearance and playback. Switch to PDF or a sharing link when attachment is impractical.
XKey has no file-size reduction, compression or cleanup feature. Every fix in this article uses native PowerPoint features. After rebuilding a deck on a fresh, smaller master, XKey's Convert to Default Bullet Points and Default text box tools can help keep slide formatting consistent. They format slide content; they do not reduce file size. See XKey's slide tools for their intended uses.